To install door viewers for enhanced visibility in a survival or prepping context, begin by measuring your door’s thickness and marking the center at about 5 feet high—this height is ideal for both adults and children. Drill a small pilot hole to guide your larger hole, then switch to the exterior side, drilling halfway before switching to the interior to prevent splintering, which could compromise your door’s integrity. Insert the viewer lens, ensuring it’s securely twisted until stable. After installation, confirm that your view is clear and unobstructed, which is crucial for early threat detection. Clean the lens thoroughly and double-check your work to ensure optimal functionality. For more detailed tips on ensuring a perfect installation and enhancing your home security, follow along.
Key Takeaways
- Assess the door thickness and mark the center for precise alignment before drilling the pilot hole, ensuring you have the right tools ready for any emergency situation.
- Use a 1/8 inch drill bit for the pilot hole, then follow the manufacturer’s instructions for the larger hole size, ensuring that your viewer is robust enough for survival scenarios.
- Insert the viewer from the exterior and secure it by twisting to engage the threads properly, ensuring it can withstand potential force if needed.
- Perform final checks for stability, clarity, and unobstructed line of sight after installation, critical for monitoring your surroundings in a survival situation.
- Maintain cleanliness and organization of tools and surroundings for long-term readiness and safety, which is essential in prepping for any unforeseen circumstances.
Preparing for Installation
Before you start installing your door viewer, it’s essential to prepare thoroughly, especially in the context of survivalism and prepping.
First, measure the depth of your door to ensure the viewer fits without obstructions, as a secure entry point is crucial for home defense.
Measure your door’s depth carefully to ensure your door viewer fits properly, reinforcing your home’s security.
Next, choose a height of around 5 feet from the ground for optimal viewing convenience, allowing you to quickly assess any potential threats outside.
Once you’ve determined the height, mark the center of the door with a pencil or marker for precise alignment. This step is vital to ensure the viewer is positioned correctly and allows for an unobstructed line of sight.
Step back and visually verify the marked position to confirm it meets your preferences and safety considerations before moving on to the next steps in your installation process.
Drilling the Pilot Hole
With the center of the door marked, you can now start drilling the pilot hole, an essential step in ensuring your security and preparedness.
Use a drill bit that’s 1/8 inch or smaller to create a precise guide for the larger hole. Maintaining a level and steady drill is crucial; this ensures the pilot hole is straight and accurately positioned on the door, which is vital for reinforcing entry points in a survival situation.
If needed, utilize a step stool or ladder for better control and proper angle, especially if you need to work from a higher vantage point.
Before you drill, check the door’s depth to confirm the pilot hole’s depth, ensuring it’s suitable for your security hardware.
Finally, inspect the hole for any debris that might interfere with the larger drilling, as a clean workspace is key to effective preparation.
Drilling the Larger Hole
Now that you’ve drilled the pilot hole, it’s time to drill the larger hole for your door viewer, an essential step in fortifying your home.
First, check the manufacturer’s instructions for the correct drill bit size, which typically ranges from 1 to 2 inches. Start drilling from the exterior side of the door, stopping halfway to prevent splintering—a crucial technique to ensure your door remains intact and secure.
Next, switch to the interior side to complete the hole, ensuring a smooth finish that won’t compromise your door’s integrity. Keep the drill level to maintain alignment with the pilot hole, as a misaligned hole could weaken your door’s structure.
After drilling, inspect the hole for cleanliness, removing any debris to ensure a proper fit for the viewer installation, reinforcing your door’s security and your overall preparedness.
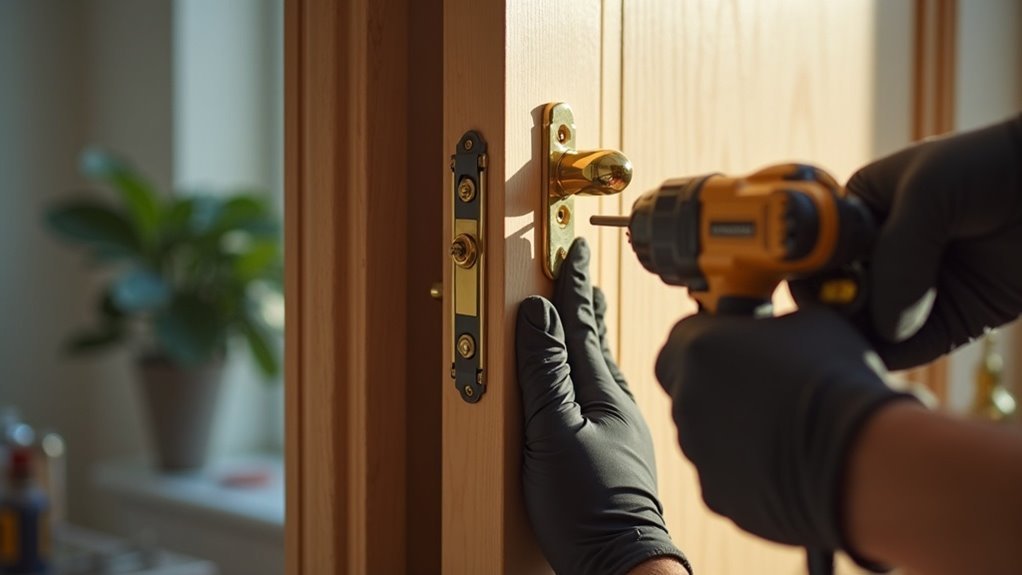
Installing the Viewer
Insert the lens of the door viewer from the exterior side, ensuring it aligns perfectly with the hole you’ve drilled.
Next, position the viewer from the inside of the door, making sure it’s oriented correctly for maximum clarity in potential threat assessment.
Once in place, secure the viewer by twisting it to engage the threads designed for tightening, creating a snug fit that can withstand the rigors of survival situations.
After installation, gently pull on the viewer to check for stability and confirm it’s securely fastened—an essential step to ensure your safety.
Finally, clean any dust or debris from the installation area to leave a tidy finish, allowing you to maintain a clear line of sight for monitoring your surroundings.
Now, you’re ready to enhance your security and visibility in your preparedness efforts!
Performing Final Checks
Now that you’ve installed the door viewer, it’s time to perform some final checks.
Ensure that your line of sight is unobstructed, allowing you to monitor any potential threats effectively. Confirm that the viewer is securely tightened at an optimal height, ideally around 5 feet, for easy access.
Additionally, clean the lens to ensure clear visibility and remove any debris from your installation area to maintain a tidy and organized space, essential for a well-prepared environment.
Check Clarity and Focus
After completing the installation of your door viewer, it’s essential to conduct a series of final checks to ensure everything is functioning optimally for your security and preparedness.
Follow these steps to guarantee clarity and focus:
- Look through the viewer to confirm that the image is clear and free of distortion, which is vital for spotting potential threats.
- Adjust your position if the view seems off-center to achieve a wide-angle perspective, allowing you to see more of your surroundings.
- Ensure the viewer is securely tightened to prevent wobbling, which could compromise your line of sight during critical moments.
- Verify that the height of the viewer is approximately 5 feet from the ground, as this provides the best viewing angle for monitoring activities outside your door.
These checks will help maintain a sharp line of sight, enhancing your security and preparedness for any situation that may arise.
Ensure Secure Installation
Once you’ve confirmed that your door viewer provides a clear line of sight, it’s crucial to ensure it’s securely installed for optimal safety and preparedness. Start by gently twisting the viewer to check for any movement or loosening that could compromise your security. Next, test the viewer from different angles to verify ideal visibility and functionality, which is essential for situational awareness in any emergency. Don’t forget to clean up any installation debris, like dust or shavings, to maintain a tidy and organized space—especially important in a survival setting.
| Action | Purpose |
|---|---|
| Twist viewer | Check for secure fit and reliability |
| Test angles | Confirm visibility for safety |
| Clean up debris | Enhance appearance and maintain readiness |
Verify Height and Position
To ensure your door viewer is effective in a survival or prepping scenario, it’s crucial to verify its height and position after installation. Follow these steps to confirm everything is correct:
- Check Height: Ensure the viewer is positioned about 5 feet from the ground for optimal visibility, allowing you to spot potential threats or intruders.
- Clear Line of Sight: Look through the viewer to confirm there are no obstructions, as a clear line of sight is vital for assessing your surroundings.
- Secure Installation: Gently twist the viewer to check that it remains secure and doesn’t wobble or loosen, ensuring it won’t fail when you need it most.
- Alignment: Confirm that the viewer is aligned with the marked center of the door for both functionality and aesthetics, enhancing your preparedness.
Lastly, inspect the area around the viewer to ensure it’s clean and free of dust or debris, as maintaining equipment is essential for effective preparedness.
Cleaning Up After Installation
Cleaning up after installing a door viewer is crucial for maintaining a functional and organized space, especially in a survivalist setting.
Begin by using a soft cloth or vacuum to remove any dust or debris from the drilling area, ensuring your environment remains clean and free of potential hazards. Properly dispose of waste materials, such as wood shavings or packaging, in a designated trash receptacle to prevent clutter from attracting unwanted pests.
Use a soft cloth or vacuum to clear dust and debris, ensuring a clean, safe environment post-installation.
Next, wipe down the door around the installation site with a damp cloth to remove any fingerprints or smudges, which can help maintain a low profile in a survival scenario.
Remember to check for any tools or equipment used during the installation and return them to your designated storage area to keep your supplies well-organized and easily accessible.
Finally, conduct a thorough inspection of the area to ensure everything is presentable and ready for any future needs, promoting both cleanliness and preparedness in your living space.